You down with IDP? Impersonate me!

Summary
Permiso Security and ACV Auctions, while collaborating on cloud detection efforts, discovered an impersonation technique in Okta application user assignments. Based on “in the wild” detections Permiso has reviewed, this technique is being utilized for both benign and nefarious purposes.
When an Okta Administrator changes their or another’s username assignment to a different existing user, an unexpected impersonation event can occur, allowing the impersonator to authenticate and assume the permissions of the impersonated user in the target application.
User impersonation affects the ability to repudiate actions taken by a given user; actions taken by the impersonator will be attributed to the impersonated user.
Using this technique, an Okta Administrator can cause themselves or someone else to have elevated rights as an impersonated user in another application or environment such as Azure, GCP, or AWS.
This impersonation technique is also an effective method of bypassing multi-factor authentication (MFA). While the impersonator may have had to pass their own MFA check, they are not forced to provide an MFA verification again under the context of the impersonated user.
💡 For Permiso clients, a detection (P0_OKTA_ADMIN_POTENTIAL_USER_IMPERSONATION_1) for this technique has already been deployed.
.webp?width=1084&height=813&name=Untitled_1_%20(1).webp)
Demos
Okta Impersonation into AWS
In the video below, Nathan demonstrates using the Okta impersonation technique to gain elevated privileges into AWS.
Video 1: Okta Impersonation into AWS
In this demo notice that while Okta does remove the AWS app tile from the “My Apps” workspace, it does not stop authentication from occurring when browsing directly to the AWS application URL.
Okta Impersonation into Google Workspace
In the video below, Nathan demonstrated using the Okta impersonation technique to gain access to another users Google Workspace to include, email, Google Drive, etc.
Video 2: Okta Impersonation into Google Workspace
While Nathan did provide MFA for the identity “John”, once impersonating Sally who has MFA required, he was not prompted to answer an MFA challenge for Sally.
Threat Actor Usage
In order to perform this impersonation technique an attacker must have appropriate user and application level administration permissions. An insider threat or an attacker with a compromised account could use this technique in several ways. A few examples of many:
-
Gain access to an application under the context of a targeted identity. For instance, view and send email as the impersonated identity.
-
Gain elevated permissions. While they may have access to Okta admin, perhaps they do not have the privileges needed to complete their mission in a targeted application like AWS. The attacker could impersonate as an admin of the AWS application to elevate permissions
-
Evade detection by impersonating as an identity that already has permissions in the target application. Logging will show the impersonated user as the identity responsible for all actions.
-
Bypass the MFA check for the impersonated user. Since the attacker has already passed MFA with their own account, when they perform this impersonation technique, they are not required to use MFA again under their own, or the impersonated victims identity.
What does this look like in logs?
To identify this in logs, review application.user_membership.change_username events. In the target value array there will be three (3) entries. The third entry of the array (User) is the impersonator, and the first entry of the array (AppUser) is what the identity name is being changed too.
"target": [
  {
    "id": "unknown",
    "type": "AppUser",
    "alternateId": "impersonated.user@permiso.io",
    "displayName": "Impersonator",
    "detailEntry": null
  },
  {
    "id": "57fae2906pBNbLMpoI93066",
    "type": "AppInstance",
    "alternateId": "AWS Single Sign-on",
    "displayName": "AWS Single Sign-on",
    "detailEntry": null
  },
  {
    "id": "57fae2906pBNbLMpoI93066",
    "type": "User",
    "alternateId": "impersonator@permiso.io",
    "displayName": "Impersonator",
    "detailEntry": null
  }
]
Detection
To identify if this technique is being used in your Okta environment, review application.user_membership.change_username events where each of the following are true:
-
The identities in the alternateId field are different for the
Userand theAppUser -
The impersonated identity (
AppUser) is an existing identity in the target application (AppInstance)
If you are a Permiso client, the rule P0_OKTA_ADMIN_POTENTIAL_USER_IMPERSONATION_1 will alert you when this activity occurs. In the Permiso product when triaging impersonation alerts, pay specific attention to the sessions access chain for a high level summary of the impersonation access.

Permiso Access Chain showing Nathan impersonating Ian to gain access to AWS through Okta
Caveats
-
This technique is not always used for malicious purposes. This technique is sometimes used for legitimate name changes for example.
-
This technique does not work with all applications. Any application that forces a second MFA auth for instance would be in a more protected state. Some applications like Github also perform validation on their side, stopping the technique from working and even presenting a warning message.
-
There are some apps that are purposely configured with different User and AppUser values. Looking at you “On The Fly App”.
-
The attacker must have admin permissions to perform this impersonation attack. Full details on the specific permissions required are in the “Impersonation Procedures Details” below
Recommendations
-
Enforce MFA for Administrators (or just everyone): An attacker must first have access to an administrator identity to perform this technique. Utilizing MFA will reduce the risk of an account being compromised. While MFA is important and should be leveraged for all accounts, it is not a silver bullet. Determined attackers have and will continue to bypass MFA. The recent Oktapus report serves as a reminder.
-
Regularly review Okta Administrators for evidence of compromise.
-
Regularly review
application.user_membership.change_usernameevents for potential impersonation.
Responsible Disclosure
At Permiso, we believe in responsible disclosure. We reported our findings to Okta directly on July 27th, 2022. They quickly responded to our report on July 29, 2022. Okta informed us that this is expected behavior for the edit user assignments functionality, and recommended ensuring Okta Administrators have MFA required, be tightly controlled, and heavily monitored.
Appendix
Impersonation Procedures Details
Required Permissions
The permissions required include both user and application level permissions. To achieve this, the administrator must either be one of two Okta built roles, Super Administrators or Application Administrators, or will require a specific set of custom permissions. The custom administrator role must include each of the following permissions in order to have the correct rights to change a username within an application assignment.
-
Custom Administrator Role
-
User Permissions:
-
View users and their details(Required to view user directory and user application assignments)
-
Edit users' application assignments**(Required to edit the username field)
-
-
Application Permissions:
-
View application and their details(Required to view application assignments)
-
Edit application's user assignments(Required to edit the username field)
-
-
-
Resource Set Types - Once the custom role is being applied to a user, you must choose a resource set, these are the minimum requirements:
-
Users(Required to view Users)
-
Applications(Required to view Applications)
A group can be applied to the resource set types to limit what users and applications an administrator can work with.
-
Procedures to Reproduce
-
Login to Okta.
-
Access the admin center.
-
To continue you will need the appropriate level of permissions described above.
-
There are a few paths forward from here. Each involves changing your own username under the context of an application, to that of the person you wish to “impersonate”.
💡 The most important requirement for this to work is that you as the
impersonatorand the target (impersonated user) must both already be assigned to the application. Otherwise you will simply end up creating a new user if auto provisioning is setup or nothing will happen as the impersonated user doesn’t exist in the application.
User Directory Procedure:
-
From the user directory, select yourself.
-
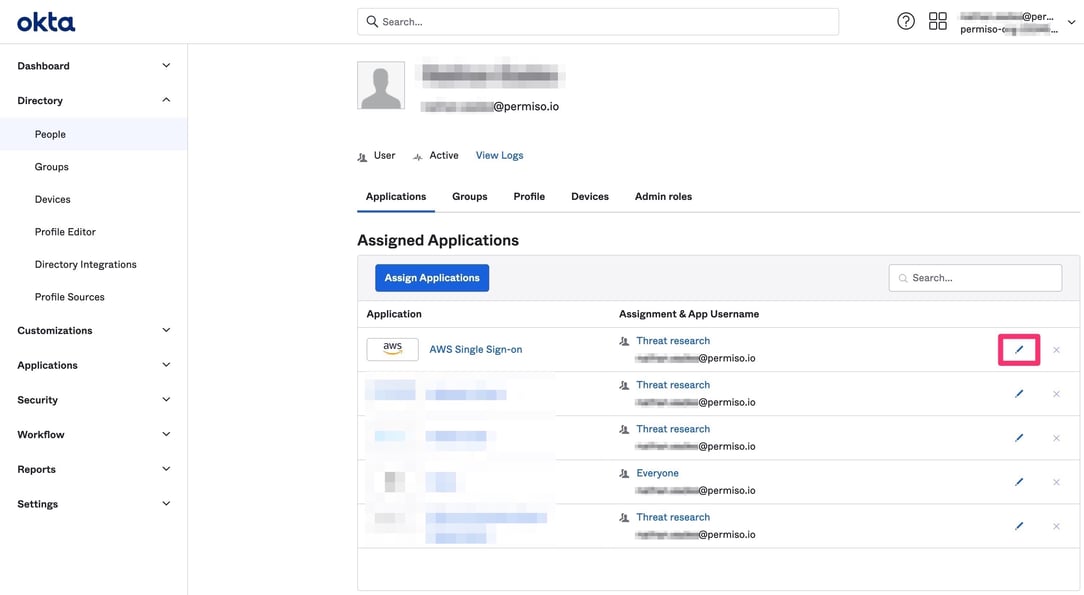
This will bring up your list of assigned applications. Select the pencil icon next to the application in which you plan to impersonate another user.

💡 Reminder: You and the target must already be assigned and provisioned within the application.
-
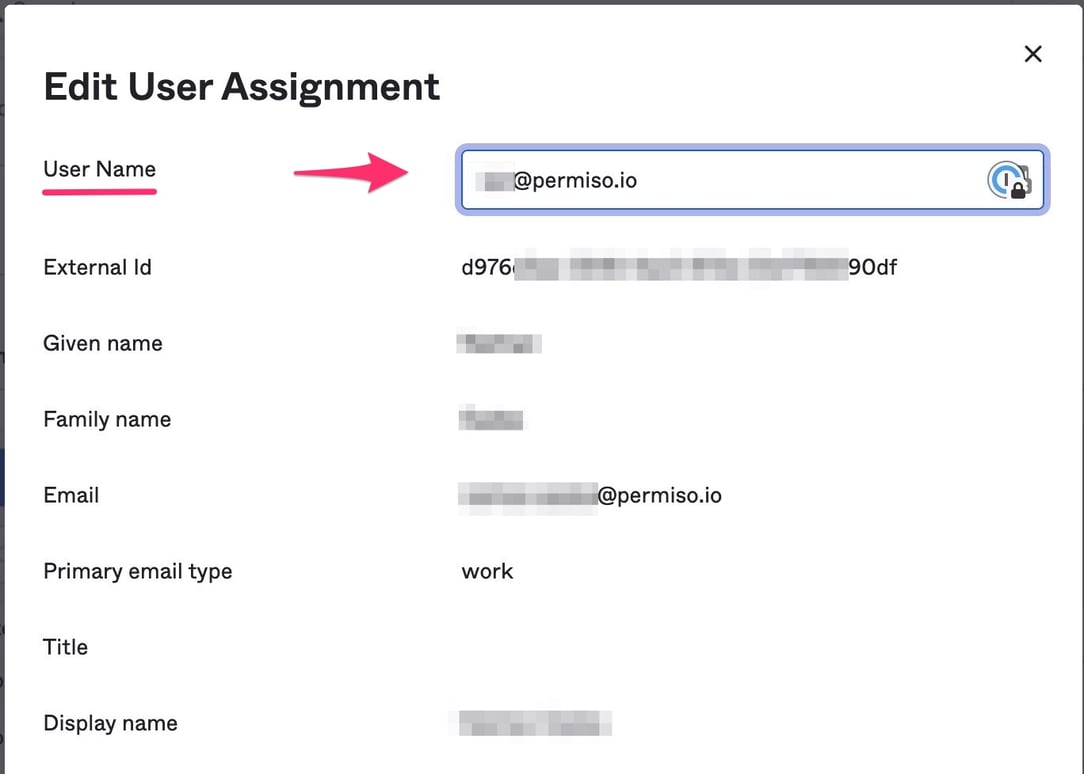
Under the username field (the first field), change your own username to that of the target.

-
To reverse, switch your username back to yourself under the application.
-
If after making this change you find that you receive an error and/or the application is missing under your own Okta dashboard, see the Errors section below.
-
Select the Okta apps icon in the top right, followed by My end user dashboard. Or have the person that impersonation was set for, go to their own Okta dashboard. From here click on the Application you are impersonating to login as the impersonated user.
Application Directory Procedure:
-
From the application directory, select the application where you plan to impersonate someone.
-
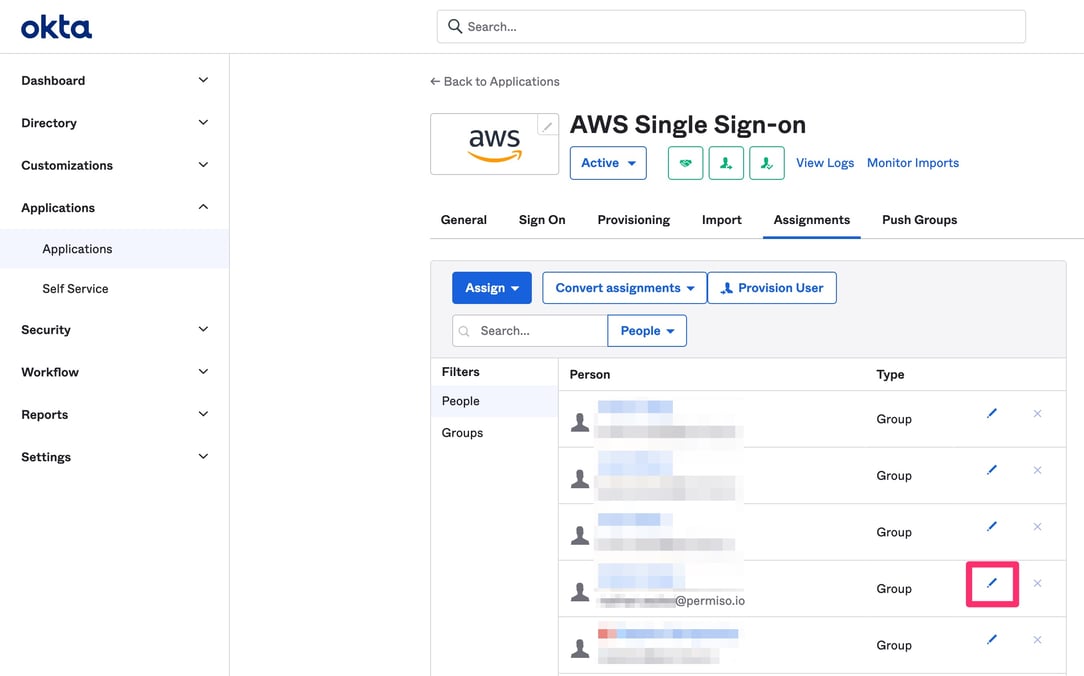
Once the application is selected, this will bring up the list of assigned users.
-
Determine who you plan to impersonate then select the pencil icon next to your own username.
💡 Reminder: You and the target must already be assigned and provisioned within the application.
-
Under the username field (the first field), change your own username to that of the target.

-
To reverse, switch your username back to yourself under the application.
-
If after making this change you find that you receive an error and/or the application is missing under your own Okta dashboard, see the Errors section below.
-
Select the Okta apps icon in the top right, followed by My end user dashboard. Or have the person that impersonation was set for, go to their own Okta dashboard. From here click on the Application you are impersonating to login as the impersonated user.
Errors
-
Depending on the application, you may get an error from Okta and the application:

-
From the error, it appears your attempt has failed, if you go to your Okta dashboard you will also likely find that your application no longer shows in the Okta dashboard.
-
Instead, go to the application directly to sign in, which will still try to use Okta SSO. The sign-in process should still be successful despite the error and the missing Okta dashboard option. If you were previously using the application you may need to logout and log back in, but you should now be impersonating the chosen user.
Logging
Example Okta Event: application.user_membership.change_username
{
  "actor": {
    "id": "57fae2906pBNbLMpoI93066",
    "type": "User",
    "alternateId": "impersonator@permiso.io",
    "displayName": "Impersonator",
    "detailEntry": null
  },
  "client": {
    "userAgent": {
      "rawUserAgent": "Mozilla/5.0 (Macintosh; Intel Mac OS X 10.15; rv:102.0) Gecko/20100101 Firefox/102.0",
      "os": "Mac OS X",
      "browser": "FIREFOX"
    },
    "zone": "null",
    "device": "Computer",
    "id": null,
    "ipAddress": "123.123.123.123",
    "geographicalContext": {
      "city": "Area 51",
      "state": "Nevada",
      "country": "United States",
      "postalCode": "89020",
      "geolocation": {
        "lat": 37.2313663,
        "lon": -115.8390264
      }
    }
  },
  "device": null,
  "authenticationContext": {
    "authenticationProvider": null,
    "credentialProvider": null,
    "credentialType": null,
    "issuer": null,
    "interface": null,
    "authenticationStep": 0,
    "externalSessionId": "201mm6f-CBETfm_M2pb24Q9Bw"
  },
  "displayMessage": "Change user's application username",
  "eventType": "application.user_membership.change_username",
  "outcome": {
    "result": "SUCCESS",
    "reason": null
  },
  "published": "2022-07-01T16:39:43.032Z",
  "securityContext": {
    "asNumber": null,
    "asOrg": null,
    "isp": null,
    "domain": null,
    "isProxy": null
  },
  "severity": "INFO",
  "debugContext": {
    "debugData": {
      "requestId": "Qy9jBud_J0m7vVsVxEzhQPPNM3o",
      "requestUri": "/api/v1/apps/9jlsdjfksdo7gB88pb286/users/88uxb905lsngMNfwI746",
      "oldDisplayName": "impersonator@permiso.io",
      "url": "/api/v1/apps/9jlsdjfksdo7gB88pb286/users/88uxb905lsngMNfwI746?"
    }
  },
  "legacyEventType": "app.generic.config.app_username_update",
  "transaction": {
    "type": "WEB",
    "id": "Qy9jBud_J0m7vVsVxEzhQPPNM3o",
    "detail": {}
  },
  "uuid": "46b3095g-k66k-00pp-n45k-b345c2gj84ll",
  "version": "0",
  "request": {
    "ipChain": [
      {
        "ip": "65.191.160.115",
        "geographicalContext": {
          "city": "Area 51",
          "state": "Nevada",
          "country": "United States",
          "postalCode": "89020",
          "geolocation": {
            "lat": 37.2313663,
            "lon": -115.8390264
          }
        },
        "version": "V4",
        "source": null
      }
    ]
  },
  "target": [
    {
      "id": "unknown",
      "type": "AppUser",
      "alternateId": "impersonated.user@permiso.io",
      "displayName": "Impersonator",
      "detailEntry": null
    },
    {
      "id": "57fae2906pBNbLMpoI93066",
      "type": "AppInstance",
      "alternateId": "AWS Single Sign-on",
      "displayName": "AWS Single Sign-on",
      "detailEntry": null
    },
    {
      "id": "57fae2906pBNbLMpoI93066",
      "type": "User",
      "alternateId": "impersonator@permiso.io",
      "displayName": "Impersonator",
      "detailEntry": null
    }
  ]
}
Credits
-
ACV Auctions: Vince Bruno and Alex Wilson
-
Permiso: Nathan Eades, Andy Kraut, and Ian Ahl


